Is your computer or laptop hanging and freezing with 100% disk usage notice popping up frequently? In this article, we’ll show how to fix the Windows 10 100 percent disk usage problem.
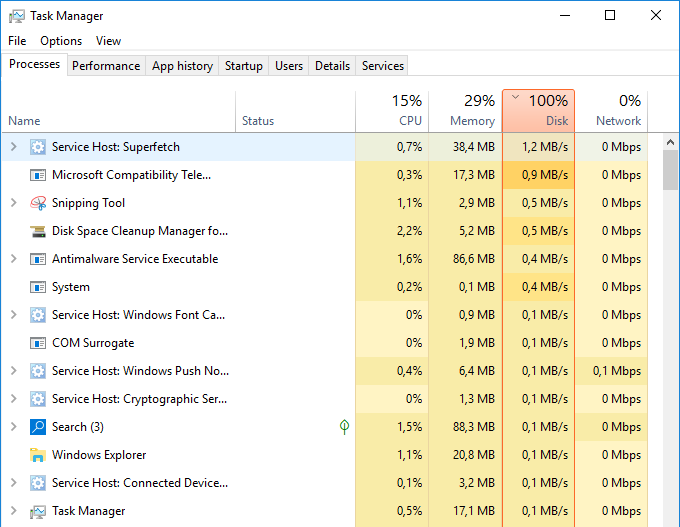
With 100% disk usage, many activities like booting to desktop, mouse movements, opening of apps and windows begin to slow down obviously and sometimes they could become unresponsive entirely. If you open your task manager using Ctrl+Shift+Esc key shortcut, click on more details and under the process tab you will notice your disk utilization percentage nearing or consistently on 100 percent. Don’t let these problems bother you anymore. Here below we have mentioned 10 possible and often effective solutions to fix 100 % disk usage issues in Windows 10.
Solution 1: Disable Windows Search Service
The Windows Search service constantly indexes all files on your disk so as to make them quickly available when you search for them. This search indexing could overwhelm your disk read-write capacity and keeps its usage state very high, hence slowing down your Windows.
To disable Windows search service,
- Press the keyboard combination Ctrl + Shift + Esc to open task manager pop up.
- Click on “Services” tab:
- On the bottom of the page, click on “Open Services” you should have the services Window pop up.
- On this window, search for “Windows Search”.
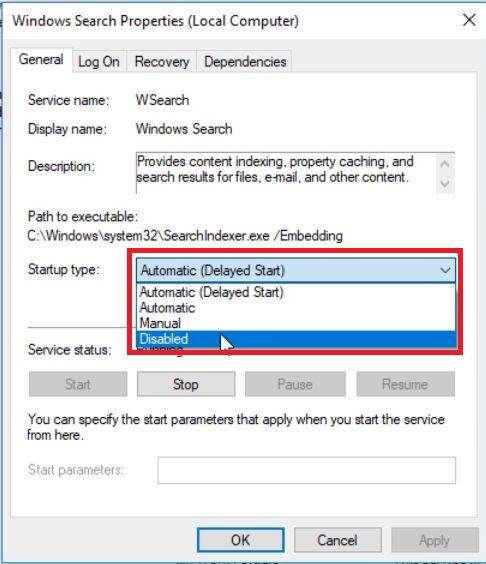
- Right-click on it and select properties.
- On the properties dialog box under General tab where it says Startup type, click on the drop-down and select disabled.
- Apply and hit ok.
Restart your computer and see if the problem has been resolved.
Solution 3. Run antivirus check
Getting Infected with malware can also cause such performance issue, so you need to confirm this by running a scan with your antivirus software, or at least you can use some tools such as Malwarebytes Anti-Malware to scan your system drive and detect any problems, although it may take a while since your drive already having a heavy load.
If threats are found, use the suggestions and recommendations to discard them and reboot your system.
Solution 4: Reset Virtual Memory
Virtual memory is a kind of memory management technique that extends your RAM virtually into harddisk, to improve performance. But sometimes this technique could be generating too many read-write requests on the hard disk that could lead to high disk usage.
You can reset your virtual memory, with following steps
1.Go to control panel
2. On the control panel Window, locate the System icon, and click on it.
3. Go to on “Advanced System Settings” and click.
4. The Systems properties dialog box should pop up. On the advanced tab, click on Settings under Performance.
5. The performance Options dialog box should pop up, here click on the advanced tab once again,
6. Under the Virtual memory, click on Change.
7. Below the Virtual memory window, you should see your Minimum allowed, Recommended, and Currently allocated virtual memory sizes. Here if your currently allocated memory is larger than the recommended size then reset it back to normal size.
This might help you.
Solution 5: Update your SATA driver
Could a storage device driver be resulting in the 100% disk usage error?
Your Windows 10 computer almost certainly uses SATA connections for hard drives, SSDs, and optical drives. If the drivers aren’t up to date, the disk usage error can occur.
This can be avoided by upgrading to the latest SATA drivers.
1.Open the Power User menu with WIN+X and select Device Manager.
2. Expand Storage controllers, then identify the correct controller for your SATA devices. If you can’t do this, don’t worry—simply update both.
3. To update, right-click on each controller and select Update driver.
4. Select the Browse my computer for driver software option, then choose Let me pick from a list of available drivers on my computer.
5. Choose the Standard AHCI Controller and see how this impacts performance.
You may need to reboot Windows for this to take effect. Note that if it doesn’t work, you can still try this by checking the manufacturer’s website for a new driver. This can be installed using the instructions that accompany it.
Solution 6: Check the Configuration of Your AHCI PCIe
The AHCI (Advanced Host Controller Interface), is a technical standard that defines the operation of your SATA host controller. This host controller connects your computer to the hard disk. Sometimes when your disk would not respond properly to input output requests when the so called Message Signaled Interrupt (MSI) mode is enabled hence leading to such high disk usage problem, this could be due to firmware bug or some issues with the inbox AHCI driver called StorAHCI.sys driver. To resolve this issue, you first need to check to see if you are running the inbox AHCI driver.
To do that open a command prompt with administrator privileges. Then type the following command in the command prompt window and hit Enter: devmgmt.msc
- Under IDE ATA/ATAPI Controllers right-click on the AHCI controller node and select Properties. This node is usually called “Standard SATA AHCI Controller.”
- Navigate to the driver tab and click Driver Details.
- If you see “StorAHCI.sys” in the list, you are running the inbox driver.
Disable MSI for the controller in the registry:
- In the same properties window opened in step 1.2, navigate to the Details tab and select Device instance path from the Property drop-down menu. Note this path.
- Open the registry editor by typing regedit in the previously opened command prompt.
- Navigate to: HKEY_LOCAL_MACHINE\System\CurrentControlSet\Enum\PCI\ <AHCI Controller>\Device Parameters\Interrupt Management\MessageSignaledInterruptProperties, where <AHCI Controller> refers to the device instance path you noted in step 2.1.
- Change the value of the MSISupported key from “1” to “0”.
Restart your computer and check if the issue has been resolved.
Solution 7: Enable High Performance mode
Standard power modes are more prone to the 100% disk usage bug but switching to high performance often overcomes the problem
The downside, of course, is that your computer will use more power. Thanks to modern processor design this shouldn’t be a massive issue. However, in notebooks and desktop replacement laptops battery life can get reduced.
To change to high performance, open the Power & sleep screen with WIN+X > Power Options. Here, click Additional power settings, select High performance, then OK.
Solution 8. Disable Superfetch :
Superfetch is a Windows system process that increases the performance of Windows by preloading apps you frequently use into RAM before you need to use them. Generally, there’s no need to stop Superfetch from running. It uses a very minuscule amount of CPU, and only uses unused RAM. All of this is unnoticeable to the general user. But this service has been reported to cause 100% disk usage and other performance-related problems by Microsoft users. So if you are having the same problem you should consider disabling this service.
Steps to disable Superfetch (Sysmain) on Windows 10 are following.
1. Select the Start menu, type services, and select the Services app. You could also press Windows + R, type services.msc and press Enter.
2. In the Services app, scroll down to SysMain, right-click on the service and select Stop. If you’re running an older version of Windows, right-click on the SuperFetch service and select Stop.
- Now you need to prevent the service from restarting when you start Windows. Once the service is stopped, right-click on the service again and select Properties.
- In the Startup type dropdown, select Disabled.
Solution 9. Disable prefetch and flash in Chrome.
Flash remains one of the most vulnerable aspects of today’s computing and should be disabled. Flash in the google chrome browser is also a common reason for 100% disk usage in Windows 10.
Steps to Disable flash:
1. Click the “Menu”: button in the upper-right corner, then select “Settings”.
2. Go to Privacy and security and click the section marked Site Settings.
3. Find the Flash and set the toggle to Block sites from running Flash, then click Back.
Another thing in the Chrome that can cause high disk usage issues is its Pretfech service. Disabling this services can be very helpful.
Steps to Disable Prefetch are following:
1. Click the “Menu” button in the upper-right corner, then select “Settings“.
2. Scroll down and select the “Advanced” option.
3. Scroll down to the “Privacy and security” section, then toggle the “Use a prediction service to load pages more quickly” option to the left to disable Prefetch.
Solution 10. Update Window:
Using an older build of Windows 10 can be another reason for high disk usage in Windows 10. Check if your build is up to date or not. “Update and security” section of the Windows Settings app.
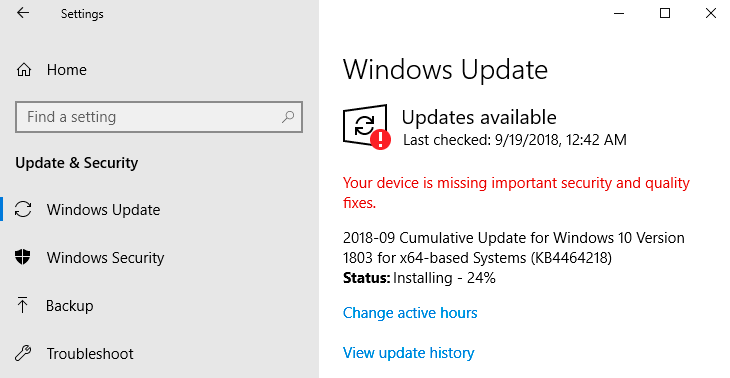
To install update select Start > Settings > Update & Security > Windows Update , and then select Check for updates. If updates are available, install them.
Updating windows may solve the high disk usage issue as well as improve the overall performance of your system.